Monday, January 31, 2011

Love Owls

I saw THIS CARD from someone else's blog.  Georgeann mentioned that her card was a "hybrid" card. She used My Digital Studio to print out her sentiment.  Everything else was stamped and punched.  Well, that got me thinking.  Stampin' Up! just came out with new digital downloads for Valentine Defined.  I was planning on purchasing this set, but didn't know if I really NEED it.  So I got the digital version first.  So, I designed this card using the love strands from this set, then made my own sentiment.  I printed on white cardstock.
Let me just tell you that printing results were really good!  I was very pleased, actually.  Plus, I might have saved myself some money by not purchasing this particular set.  Shhhh.... please don't tell anyone.  If you are considering purchasing your own copy of My Digital Studio, do it!  The downloads are very inexpensive.  You can play with it as soon as you purchase it online HERE.  No more waiting for Mr. Brown (aka UPS)!  You can try out stamp sets, designer papers, embellishments.  And they never retire and you'll never run out of them!  Plus, as you can see, going digital doesn't mean you forget the hands-on stuff.

Oops, got on a tangent.  Anyways, here is a close up of the heart punchouts that I placed on the sentiment.  I used the new Glimmer Paper from the Occasions Mini.  OMG!  This paper is GORGEOUS!!!  I'm not really too much a bling-bling kind of a person.  But OMG, this paper is gorgeous! :)  Seriously, it's awesome.  Sooooooo pretty in real life.  The glitter doesn't flake off.  And a little bit goes a long way.  I'm planning on using every single scrap of that paper pack, and not let ANY go to waste!

My Supplies List (all supplies and images by Stampin' Up! unless otherwise noted):
Stamp Set(s): Valentine Defined (digital download for My Digital Studio)
Ink: Early Espresso (digital)
Papers: Real Red, Glimmer Paper, Early Espresso, Daffodil Delight, Old Olive, Sending Love DSP (retired)
Accessories: Two-Step Owl Punch, Two-Step Bird Punch

Saturday, January 29, 2011

Pun Fun Week Day #6 - BONUS!

I wanted to use this stamp in the Pun Fun set, eventhough I couldn't come up with anything Valentine with it.  This image naturally lends itself to a boy card, in my opinion.  So I wanted some boy colors.  I came upon this color combination at Stacey's Curtain Call Color Challenge.  I love having all the colors a color challenge calls for.  I'm starting to build my collection with Stamin' Up!'s cardstock.  I really like these color cardstock.  They're made nice and sturdy.  And of course, you can't beat the color coordination with SU!'s colors.  I am just shocked at how well these colors go together.

I also used Sweet Sunday's sketch as inspiration.


OK, so I started off really trying to do the challenge adhering to the sketch.  However, it kind of took on its own life...

I started with using a Sizzix Bigz die that can make a scallop card.
I had these Top Note Die-like cutouts with my Cricut lying on my desk (eh, dining table).  So I thought I'd cut another one, smaller, with the DSP, and use the white as mat.  I used markers to color the image.

My Supplies List (all supplies and images by Stampin' Up! unless otherwise noted):
Stamp Set(s): Pun Fun
Ink: Early Espresso
Papers: Pumpkin Pie, Pacific Point, Wild Wasabi, Real Red
Accessories: Scallop Trim Edge Punch, Scallop Card Sizzix Bigz die (non-SU), embossing folder (non-SU), Crystal Effects (on card 1)

Friday, January 28, 2011

Pun Fun Week Day #5

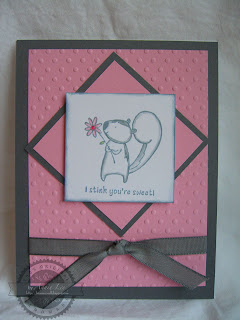
Just got word that I will have a brand-new-to-stamping attendee at my workshop in a week.  Since I'm brainstorming some ideas for projects to make at the workshop, I decided to do a CAS (clean and simple) card, but with some wow.  Of course, I go to my trusty Big Shot for the easy and wow.
Initially I designed the card to have all the components straight and squared up.  But by moving my hand a little by accident, I thought the diamond looks nice.  I thought it looks like it's more work than straight in the center.  And what could be easier as embellishment than a nice ribbon?

Do you think it looks like a card that someone could have spent more than 5 minutes putting it together?  Because it's literally such an easy card, after the pieces are cut, to put together.  Hopefully this will impress my new stamper!

My Supplies List (all supplies and images by Stampin' Up! unless otherwise noted):
Stamp Set(s): Pun Fun
Ink: Basic Gray
Papers: Pretty in Pink, Basic Gray
Accessories: Basic Gray 3/8" Taffeta ribbon (retired), embossing folder (non-SU)

Thursday, January 27, 2011

Pun Fun Week Day #4

Yeah, we have a non-CASE'd card today.  At least I don't think I CASE'd this from anyone.  I did see someone using this combination of images though.  Aren't they cute together?
I popped up their heads to give a little dimension.

My Supplies List (all supplies and images by Stampin' Up! unless otherwise noted):
Stamp Set(s): Pun Fun, A Word for You
Ink: Poppy Parade, Soft Suede
Papers: Poppy Parade, Soft Suede, In-Color DSP
Accessories: Poppy Parade Poly-Stitch ribbon

Wednesday, January 26, 2011

Pun Fun Week Day #3

Today's card uses color combination from Scrapmaster's Paradise Color Combo #83.  Isn't it so soft and sweet?  I have never used Crumb Cake before.  I have it in my New Color Kit.  So I took it out to try.  I don't know how I feel about it.  But I think it may become a good neutral for me.  I have to play with it more to find out.  I also used Trish's card to CASE.
You know what's a surprise here?  I didn't use Modern Label Punch with my Word Window Punch.  I know, shocking, isn't it?

My Supplies List (all supplies and images by Stampin' Up! unless otherwise noted):
Stamp Set(s): Pun Fun, Teeny, Tiny Wishes
Ink: Crumb Cake
Papers: Regal Rose, Pretty in Pink, Crumb Cake
Accessories: Word Window punch, Scallop Edge Punch, Perfect Details Texturz Plate, Pretty in Pink Stripe ribbon (retired), Flower embellie (no idea where it came from.  Might have fallen off a shirt or dress!)

Tuesday, January 25, 2011

Pun Fun Week Day #2

Today's card is CASE'd from Patti.  Ilike that the main image is off-set to allow these punched hearts.
I was going to use a piece of DSP, instead of the Real Red CS.  But I forgot.  So I used Versamark to stamp the lamb (ewe) all over the CS, for a little self-designed pattern.

My Supplies List (all supplies and images by Stampin' Up! unless otherwise noted):
Stamp Set(s): Pun Fun, Picture This (retired)
Ink: Real Red, Chocolate Chip, Versamark
Papers: Real Red, Chocolate Chip
Accessories: Two-Step Owl punch (for hearts), Chocolate Chip 1/4" Grosgrain ribbon, Basic Pearl

Sale-a-Bration is HERE!!!


Do you know what today is?  Today is the start of Sale-a-Bration!  Only the biggest promotion period for Stampin' Up! all year!  I'm so excited, I can't contain myself!  You get a FREE stamp set (see Sale-a-Bration catalog) for every $50 order.  So if you order $100, you get 2; you order $150, you get 3, plus all the hostess benefits, too!  The more you order, the more freebies you can get.  How fabulous is that?!

I have soooo much stuff I want to order.  I don't know how to practice self-control. LOL.  Please let me know if you would like me to help you in placing an order, or host a workshop!  Or you can go to MY STORE to place your order now.  (You get best bang for your buck if you go through my portal here for online order.  If you go through Stampin' Up!'s main site, then choose me as your demonstrator, your shipping charge may be higher.  And you may not be able to earn those hostess benefits.)

One more thing, if you sign up as a demonstrator with me during Sale-a-Bration, you get 15% off your starter kit (regularly $175, which becomes $148.75), plus you get another $50+ worth of products for FREE.  Then you get 30% discount on your first $150+ order, placed within 45 days of sign up.  So if you place your first order during Sale-a-Bration, not only will you get 30% off on your entire order, you will still qualify for Sale-a-Bration freebies for every $50 and hostess benefits.  Can you believe how much free stuff we're talking about here???  It makes my head spin just thinking about it!  You can sign up to become a demonstrator through my Stampin' Up! website.  Click on Start Your Own Business, then click on Join Now.  No password necessary!

Monday, January 24, 2011

Pun Fun Week Day #1

This week I have decided to bring out a stamp set that I bought just about exactly a year ago, PUN FUN.  I was in my late stages of pregnancy this time last year, and I decided to go back to stamping and making cards, after a long long, very lonnnnnng hiatus.  Making cards relaxes me and brings a smile to my face.  As you fellow card makers know, making cards gives a relatively instant gratification with a finished project in one sitting.  So, in honor of my one-year return to stamping and card making, let's have a week of cards made with Pun Fun.  This is still a current set from Stampin' Up! which you can purchase through my website HERE.  Oh, and to make it more interesting, I'm making Valentine's Day cards with this set.

This set of cards are CASE'd from Jill Hilliard.  Please see her post HERE.

I hand cut the lamb; paper-pieced the snout and heart.  I sponged the Old Olive pieces to make it more dimensional.  I popped up the lamb and the sentiment.
My Supplies List (all supplies and images by Stampin' Up! unless otherwise noted):
Stamp Set(s): Pun Fun, Teeny Tiny Wishes
Ink: Real Red, Chocolate Chip
Papers: Real Red, Old Olive, Bashful Blue
Accessories: Modern Label Punch, Word Window Punch, Big Shot, Embossing Folder, Scallop Edge Punch, Pearl Gel-Pen (non-SU)

I used the "masking" technique and Stamp-a-majig to stack these coffee cups.  I tied the ribbon a little differently on this card than my usual knot.  Can you tell the difference?

I made another version of this card.

My Supplies List (all supplies and images by Stampin' Up! unless otherwise noted):
Stamp Set(s): Pun Fun, Teeny Tiny Wishes
Ink: Early Espresso, Pretty in Pink
Papers: Pretty in Pink, Certainly Celery, Certainly Celery patterns DSP (retired), Sending Love DSP (retired)
Accessories: Modern Label Punch, Word Window Punch, Pretty in Pink striped ribbon (retired), Stamp-a-majig, Big Shot, Embossing folder, Scallop Edge Punch, Stickles (non-SU), Liquid Pearl (non-SU)


I put a long strip of sticky tape on the back of the ribbon, then scrunched them to get this effect.  I think next time maybe I'll put the tape on the paper instead and see what happens.  I'll let you know!

My Supplies List (all supplies and images by Stampin' Up! unless otherwise noted):
Stamp Set(s): Pun Fun, Teeny Tiny Wishes
Ink: Poppy Parade, Soft Suede
Papers: Soft Suede, Poppy Parade, Sunny Garden DSP
Accessories: Decorative Label Punch, Poppy Parade Poly-Stitched ribbon

Sunday, January 23, 2011

Eat Chocolate Hybrid

After seeing all those CASE'd cards this week, I decided I should make something totally original to myself.  Recently I had realized I had bought an My Digital Studio download that already came with the program itself.  I emailed Custom Support, and they immediately allowed me to pick a different download in its place.  Stampin' Up!'s custom support team rocks!  Anyways, I decided to get Eat Chocolate stamp brush set.  I haven't decided whether I want to purchase the stamp set yet, so I thought this would be a good way for me to try it out.

I love this particular stamp from the set.  Anyone who knows me, knows I'm a chocoholic, and there is no way I can quit.  So, with MDS stamps, it's a little difficult to change color within the stamp itself.  After some trials, a lightbulb went on in my head.  I went to Photoshop, brought up this stamp.  I cut out each individual cupcake, renamed them, put them back in the stamp set file (now I have the stamps that Eat Chocolate stamp brush set comes with, PLUS these individual cupcakes).  Back to MDS.

Without doing anything to it, punches are in their real size.  Stamps, on the other hand, are quite large.  To make sure the stamp will fit in the punch, I take the Decorative Punch and put it on the paper.  Then I shrunk the stamp until it fits inside the punch perfectly.  Then I remove the punch.

Then, to have each cupcake a different color, I took a square punch and dragged it to cover the first cupcake only.  Then I add the Photoshopped cupcake, put it on the paper, change its color.  Take it to the stamp.  Try to line up and size down to approximately the same size as the other two cupcakes.  Then I drag that rectangular punch out a little further to cover the rest of the cupcakes.  Take the next two cupcakes, color them, shrink and place them where you want.  Now you have different colored cupcakes!

One note about lining these cupcakes up.  If you double click on the image, a box will come up with X and Y coordinates, as well as the width and height of the stamp.  X refers to the horizontal; Y refers to the vertical.  So, if I want the cupcakes to line up horizontally, I need to make sure the vertical (Y) coordinate is the same.  So just click on each cupcake and make sure the number for the Y coordinate is the same for all three.

Last thing to do is to print out the image and punch it out with the actual punch.  How do you like what I did with the Decorative Label punch layers???

Oh, I also lightly brushed So Saffron stamp pad over the raised embossed areas.

Hopefully all these is clear enough for you to try.  Let me know if you are unclear or need help.


My Supplies List (all supplies and images by Stampin' Up! unless otherwise noted):
Stamp Set(s): Eat Chocolate
Ink: Early Espresso, Melon Mambo, Pacific Point, So Saffron
Papers: Melon Mambo, Pacific Point, So Saffron
Accessories: Elegant Bouquet Embossing Folder, Decorative Label

Saturday, January 22, 2011

Hydrangea Birthday

I had some time, so I thought I'd make a birthday card for my mom, too.  I CASE'd this one from Gretchen Baron.  Isn't her card beautiful?
 With this card, I wanted to use purple and green.  I looked at my Shades of Spring DSP (retired), and picked Orchid Opulence (retired) and Certainly Celery.  I don't have the same embossing folder that Gretchen used.  Hers is from SU!  Mine is a *gasp* contraband from non-SU! Shhhhh.  For the life of me, I can't tie a bow correctly.  I came up with a great solution, utilizing a brad.  I just took a strip of ribbon, fold in the two sides to create the bow, then used a brad to secure it all.  Doesn't it look like it's a nice bow?  No one would know I didn't really tie it!

I cut out the hydrangea from Because I Care hostess set.  Added some Stickles and Pearls to the flowers.

Here's the inside.
I used the Ornament punch for the vase, by cutting off the pointy bottom.  Then I adhere the strips of pearls that come all attached to each other in the Basic Pearls pack.  I painstakingly cut out the flowers and stems to stick in the vase.  Well, I guess my mom is worth it. :)


My Supplies List (all supplies and images by Stampin' Up! unless otherwise noted):
Stamp Set(s): Because I Care hostess set, Sincere Salutations, On Your Birthday, Silhouette Sentiments
Ink: Orchid Opulence (retired), Orchid Opulence Stampin' Write Marker (retired), Certainly Celery Stampin' Write Marker
Papers: Orchid Opulence (retired), Shades of Spring DSP (retired)
Accessories: Ornament Punch, Flower Designer Brad, Basic Pearls, Ribbon (my stash), Stickles (non-SU), Embossing Folder, (non-SU)

Friday, January 21, 2011

Happy Birthday, Mom!

Today is my mom's birthday.  I wanted to make her something a little special.  I came across this Free Standing Pop-Up Card while perusing the Resources section of splitcoaststampers.com.
I used a retired set, Embrace Life, for the branch with flowers.  It's the only set I have (so far) that has this look.  I colored the flowers in with Stampin' Write Markers.  I didn't color all the way, or perfectly.  I wanted to have that watercolor look.  I added some Stickles to select few flowers for a little sparkle.  Click on the pics to enlarge.
   I cut out some flowers from the Sending Love DSP, and added some rhinestones to the center.  I used different sizes for each flower.

My Supplies List (all supplies and images by Stampin' Up! unless otherwise noted):
Stamp Set(s): Embrace Life (retired), Well Scripted (retired, but you can get the digital download version #121064)
Ink: Real Red, Chocolate Chip, Real Red Stampin' Write Marker, Pretty in Pink Stampin' Write Marker, So Saffron Stampin' Write Marker, Pumpkin Pie Stampin' Write Marker
Papers: Real Red, Pretty in Pink, Chocolate Chip, Sending Love DSP (retired)
Accessories: Basic Rhinestones, Eyelet, Pretty in Pink Stripe ribbon (retired), Stickles (non-SU)

Thursday, January 20, 2011

Elephant Love

You're going to think I never come up with anything original myself.  Hahaha.  But hey, the description of this blog did say, "internet-found inspirations," right?  Plus, you know, why reinvent the wheel when there are perfectly creative people to CASE cards from???

Today's card came from Vicki Burdick.  Another awesome cardmaking maven.  I just loved how she made her card, and the little girl seems to be sitting on the cardstock.
I don't have Greeting Card Kids stamp set... YET!  LOL.  BUT, I had this image from eons ago when I had a workshop at my house with an awesome demo (who has since left SU!  Boo-hoo).  Anyways, I had stamped a few more of these images, hoping to use them one day.  Well, there they sat in my scrap drawer all these years, even surviving a move.  Yet they never saw the light of day.  Well, today I finally took it out and cut one up to use!  Isn't it cute???  I have no idea what set this was from.  If you know and can tell me, then I can update my supplies list below.

My Supplies List (all supplies and images by Stampin' Up! unless otherwise noted):
Stamp Set(s): Teeny Tiny Wishes, unknown stamp
Ink: Chocolate Chip
Papers: Chocolate Chip, Real Red, Sending Love DSP (retired)
Accessories: Pinking Hearts edge punch, Modern Label punch, Word Window punch, Brads (non-SU), embossing folder (non-SU)

Wednesday, January 19, 2011

Owl Love

Today's card is totally unabashedly CASE'd from the talented Lynn Put.  When I saw this card I just fell in love... with the layout, the use of the owls and the papers.  I admit, it was because of her card that MADE me order this paper pack.
Isn't this card fun?  I love how the red owl is looking longingly at the yellow owl; and the yellow owl is obliviously looking at the hearts floating up.  I think Lynn is brilliant.  This card seems to tell a story without any moving parts!

My Supplies List (all supplies and images by Stampin' Up! unless otherwise noted):
Stamp Set(s): A Word for You
Ink: Early Espresso
Papers: Daffodil Delight, Poppy Parade, Sunny Garden DSP
Accessories: Two-Step Owl Punch, Two-Step Bird Punch (for branch), Scallop Trim Edge Punch, Ribbon (my stash, could be very old SU!), Cr*cut (for cutting circles)

Tuesday, January 18, 2011

New Digital Downloads Available

They keep comin'!  New My Digital Studio Digital Downloads available for purchase and immediate download through my store.  Go to Digital Crafting and click on Newest Downloads.  Or you can just put in the item numbers in the search box.


Item Description  Image Price Content  
124030 Tempting Turquoise Patterns Designer Series Paper           $1.95 Four Tempting Turquoise
Designer Series Paper Patterns  
124031 Old Olive Patterns Designer Series Paper       $1.95 Four Old Olive Designer Series Paper Patterns 
124033 Pretty in Pink Patterns Designer Series Paper            $1.95 Four Pretty in Pink Designer Series Paper Patterns   
124022 Sweet Stitches Designer Buttons   $2.95 Three button styles in Tangerine Tango, Melon Mambo, Chocolate Chip, and Daffodil Delight. Total of 12 buttons.  
 
124028 Pattern Pieces Stamp Brush  $1.95 One oversized fabric pattern. Coordinates with the "Oh Sew Suite" product line. 
 
124018 Blossom Petals Punch          $0.95 Four-piece stamp brush set and one 5" x 7" greeting card designer template.
 
124019 Build a Blossom Stamp Brush Set   $5.95 Twelve-piece stamp brush set. Coordinates with the digital Blossom Petals Punch. 
124027 Eat Chocolate Stamp Brush Set   $3.95 Four-piece stamp brush set.
125161 Top 10 Photo Book Template   $14.95 This 24-page designer template (11" x 8-1/2") was used to make the My Digital Studio Professional Print Product Sampler, demonstrator supply item #124261.
 
125162 2011 Pennant Desktop Calendar           $14.95 This 25-page calendar template (5-1/2" x 6-1/2" calendar with easel) was used to make the My Digital Studio Professional Print Product Sampler, demonstrator supply item #124261.
 
125623 Baja Breeze Flower Bouquet Birth Announcement          $1.95 Double-sided baby boy announcement postcard designer template. Colors are Baja Breeze, Kiwi Kiss, and Basic Gray.
 
125163 Regal Rose Flower Bouquet Birth Announcement           $1.95 Double-sided baby girl announcement postcard designer template. Colors are Regal Rose, Kiwi Kiss, and So Saffron. This template was used to make the My Digital Studio Professional Print Product Sampler, demonstrator supply item #124261.
 
125164 Play Date Invitation Designer Template           $1.95 Birthday greeting card invitation template. Front and inside of card are pre-designed. Template includes nine embellishment pieces and was used to make the My Digital Studio Professional Print Product Sampler, demonstrator supply item #124261.
 
125165 Snowflake Flurry Holiday Trifold Card Designer Template           $1.95 This 4" x 9-1/4" trifold card designer template was used to make the My Digital Studio Professional Print Product Sampler, demonstrator supply item #124261.

 
124542 Chat Room Rock Star Stamp Brush Set   $5.95 Ten-piece stamp brush set.  
124543 Chat Room Friend Stamp Brush Set  $5.95 Ten-piece stamp brush set.  
124486 Chat Room Baby Stamp Brush Set   $5.95 Ten-piece stamp brush set.  

Monday, January 17, 2011

Floral Get Well

My mom wanted a card for her former business partner, who had wrist surgery.  I didn't want the card to be too somber, since it's not a terrible health issue.  So I set to find a card to CASE.  I found THIS CARD on Splitcoaststampers.com.  I thought I'd make the card using Blushing Bride as my main color; with a pop of Concord Crush, instead of the plums in the original card.  I love this combination.


My Supplies List (all supplies and images by Stampin' Up! unless otherwise noted):
Stamp Set(s): Thoughts & Prayers, Teeny Tiny Wishes
Ink: Concord Crush, Pear Pizzazz Stampin' Write Marker, Early Espresso Stampin' Write Marker, Concord Crush Stampin' Write Marker
Papers: Concord Crush, Blushing Bride, In-Color DSP (Blushing Bride)
Accessories: Modern Label Punch, Word Window Punch, Ribbon (my stash), Stickles (non-SU), Liquid Pearl (non-SU)

Friday, January 14, 2011

Snow 2010


I wanted to show you how easy it is to do a scrapbook page in My Digital Studio.  This was a template (Christmas Jingle) that I just had to slip my photos in.  I added the snowflakes, changed opacity, and added a rhinestone to the centers.  Oh, I also added the Modern Label punch filled with a designer series paper.  It's matted (the off white background around the punch).  It's a very cool feature in MDS.  Along with the very cool Mat feature, the coolest, in my opinion, is the Drop Shadow feature.  It gives such dimension to a two-dimensional project.

This page literally took me 10 minutes while watching TV.   If you want to learn more about My Digital Studio, please let me know.  If you wish to purchase this program, please go to my website.

Wednesday, January 12, 2011

Product Shares

With the arrival of Occasions Mini Catalog, I would like to offer you the opportunity for Product Shares.  In keeping with Stampin' Up! policy, I am unable to accept payments for the shares until a round is filled.  So with that in mind, email me your interest and I will email you back right away with what number you are.  When a round has four people, I will send all participants a paypal invoice and I will order the shares.
When you email me (lovemecards@yahoo.com) please include:
Your Name
What Share(s) you would like
Phone Number
Mailing Address
Paypal Email Address

GroupThe Whole Kit and Kaboodleincludes a sampling of everything in the
Occasions Mini Catalog.
31 6x6 pieces from the six New paper packs
1 Trinket Key and 1 Trinket Crown
6 Fabric Covered Brads
12 Sweet Stitches Buttons
12 Springtime Vintage Buttons
3 Vintage Flower Adornments
3 Vanilla Satin Rosettes
3 Beveled Windowpanes
8 yards of Seam binding (2 yds each Crumb Cake, Pear Pizzazz, Baja Breeze,
Rose Red)
3 yards of Pompom Trim (1 yd each Melon Mambo, Tangerine Tango, Daffodil
Delight)

Price $35.95 please add $4.95 if you need it shipped to you in a Priority
envelope for protection and fast delivery.

OhsewsuiteOh Sew Suite Package
Six 6x6 pieces of the Sweet Stitches Designer Series Paper
Three 6x8 pieces of the Sweet Stitches Designer Fabric
12 Sweet Stitches Designer Big Buttons
3 yards of Pompom Trim (1 yd each Melon Mambo, Tangerine Tango, Daffodil
Delight)
6 Sweet Stitches Fabric Designer Brads

Price $13.99 please add $4.95 if you need it shipped to you in a Priority
envelope for protection and fast delivery.

SpringtimeSpringtime Vintage Suite Package
Six 6x6 pieces of the Springtime Vintage Designer Series Paper
Three 6x8 pieces of the Springtime Vintage Designer Fabric
12 Springtime Vintage Designer Big Buttons
3 Vanilla Satin Rosettes
3 Vintage Flower Adornments
8 yards of Seam binding (2 yds each Crumb Cake, Pear Pizzazz, Baja Breeze,
Rose Red)

Price $14.49 please add $4.95 if you need it shipped to you in a Priority
envelope for protection and fast delivery.

PaperOccasions Mini Catalog - Paper Share
31 6x6 sheets of Designer Series Paper from the following packs:
1 Red Glimmer Paper
6 Love Impressions
6 Springtime Vintage
6 First Edition
6 Botanical Gazette
6 Sweet Stitches
Price $7.50, please add $4.95 if you need it shipped to you in a Priority
envelope for protection and fast delivery.
Related Posts Plugin for WordPress, Blogger...