Thursday, June 30, 2011

Red, White & Blue Monkey

Second post again!
This is for entry for the A La Card Monkey Weekly Challenge.
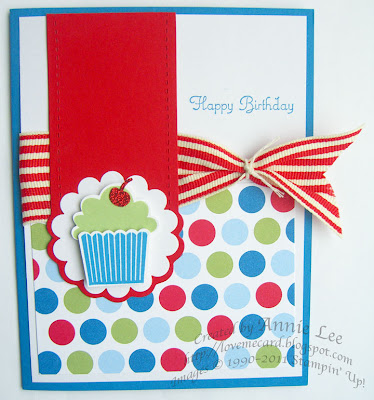
Just when I thought I was going to buy the Star punch, since I didn't have anything that would cut a star, SU went and retired the Star Punch.  Well, fear not, my friends.  There is still the Stars #2 Big Shot die available!  Look, it's so economical.  It cuts 4 different sizes of stars!  Anyways, I don't really have any appropriate image for this challenge, so I'm going without.  I looked high and low for a good "Celebrate" stamp.  Guess where I found it?  This stamp comes from a set from 1992!  OK, the sticker says 1992, but I know I probably bought it in 1999 or 2000 when I first started stampin'!  This was a great set that I just never could part with it.  And now, see, it's come in handy again!  Hmm... maybe it's time for me to convert this set to cling-mount.

When I was done, I thought I could also enter in this week's special PPA challenge.
The challenge is to show your favorite technique.  Well, I certainly love my Big Shot for embossing.  Here I used 2 different embossing folders.  AND I used a die.  So maybe anything with the Big Shot is my favorite technique! :)

My Supplies List (all supplies and images by Stampin' Up! unless otherwise noted):
Stamp Set(s): Great Greetings (Retired)
Ink: Pacific Point
Papers:  Pacific Point, Real Red
Accessories: Square Lattice embossing folder, Perfect Polka Dots embossing Folder, Stars #2 Big Shot Die, Whisper White 3/8" Taffeta ribbon, Scallop Oval punch, Oval punch, Star Brad (retired)

Celebrate Cupcakes!

I had a Cupcake Birthday Bash event in April, and I totally forgot to share any of the cards we made.   Oops.  Here's a sampling.

This first one is CASE'd from Linda.  It's #3 on her post.  In fact, it was her that inspired me to hold this event.  The DSP I used is Celebrations, which is retiring after TODAY!  This particular ribbon is also retiring.  I'm so bummed, because I really like it.  Oh well, you may see more of it on my future cards anyways.  The good news is the Build a Cupcake punch and Create a Cupcake stamp set, Glimmer paper (cherry), the bookmark from the Two-Tags Big Shot die are all coming back in the new catalog that starts TOMORROW!
 CASE'd from Barb, my upline, this birthday calendar:
 Another two CASE'd from Barb:
My Supplies List (all supplies and images by Stampin' Up! unless otherwise noted):
Stamp Set(s): Create a Cupcake
Ink: Pacific Point, Bashful Blue, Real Red, Pear Pizzazz
Papers:  Pacific Point, Bashful Blue, Real Red, Pear Pizzazz, Celebrations DSP
Accessories: Build a Cupcake punch, Perfect Polka Dots embossing Folder, Two-Tags Big Shot Die, Scallop Circle punch, Real Red Striped Grosgrain ribbon, Glimmer paper, 1/8" Taffeta ribbon, In-Color Stitched-Poly ribbon, Tasteful Trim Big Shot die, Square Lattice Die, Two-Step Owl punch (for the hearts), heart eyelet (non-SU)

Wednesday, June 29, 2011

Squared Up Mashup

Second post of the day.  Are you impressed??? LOL.
I had a few moments this afternoon and thought I'd play along Friday Mashup's challenge for this week.
For some reason, I felt like making a square card.  And I wanted to use flowers.  And I wanted to make sure I used a set that is retiring after tomorrow (Fun & Fast Notes).  Then ingenuity struck and I did this frame using the Eyelet Ribbon Border punch.  I first saw the instructions on Dawn's blog.  Pretty nifty trick, huh?

I left the image uncolored, because I don't really like coloring.  Plus, I figured, simple is better on this particular one.  I only added some pearls to the flowers for accent.

My Supplies List (all supplies and images by Stampin' Up! unless otherwise noted):
Stamp Set(s): Fun & Fast Notes, Silhouette Sentiments
Ink: Cherry Cobbler
Papers:  More Mustard, Cherry Cobbler
Accessories: Boho Blossoms punch, Word Window punch, Modern Label punch, Eyelet Ribbon Border punch, Square Lattice embossing folder, Basic Pearls

Elegant Tote

Inspired by Connie Babbert's tote HERE.  I changed the dimension a tad and the orientation of the tote.  We made this at our Fun Folds class also.
1. Take a piece of 6 3/4 x11 cs.
2. Line the short side on top of the trimmer.  Score at 5 3/4, turn it 180-degrees and score again at 5 3/4.
3. Line the line side on top of the trimmer.  Score at 5", turn it 180-degrees and score again at 5".
4. Fold all the score lines and make creases with your bone folder.
5. Cut the lines on the small tabs.
6. Fold and tape.  Use Sticky tape, as it's much stronger than your regular adhesive.

How do you like my color combo here?  I wanted the colors of the tote to work with the colors of the cards we made.  So I went to the Color Lab and put in my colors and out it comes with additional colors for a perfect combination!  Go ahead and try it yourself.  It's fun!

My Supplies List (all supplies and images by Stampin' Up! unless otherwise noted):
Stamp Set(s): Always Elegant
Ink: Marina Mist
Papers:  Wild Wasabi, Regal Rose, Marina Mist, Lap of Luxury DSP
Accessories: Modern Label punch, brads (non-SU), Stampin' Write Marker (Wild Wasabi)

Tuesday, June 28, 2011

Wedding Joy

This is the second card we made at the Fun Folds class.  This is called Joy Fold.  You can find the tutorial HERE.  This is another super easy card to make.  Two score lines and that's it!  Something a little different than the standard card that I usually make.  The ribbon keeps the card closed.  Just slide it to the side to open.
My Supplies List (all supplies and images by Stampin' Up! unless otherwise noted):
Stamp Set(s): Word Play
Ink: Concord Crush
Papers:  Concord Crush, Pretty in Pink, Lap of Luxury DSP
Accessories: Elegant Lines embossing Folder, In-Color Stitched-Poly ribbon, 2" and 1 3/4" circles, Basic Rhinestone
Related Posts Plugin for WordPress, Blogger...