Monday, May 30, 2011

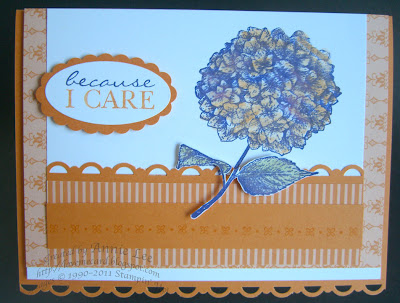
Because I Care CASE

Today's card is CASE'd from Georgeann Manning.  I thought her layout was very interesting with the main portions going all the way up to the edge.  She also popped up the entire main panel.
I turned the card on its side and changed colors.  You know, it's not as easy as it looks when you decided to change a major thing like the dimensions of the card you're CASE'ing. :)  I think I made a lot more work for myself.  Anyways, for the hydrangea, I first stamped it on the Whisper white.  Then I stamped another, just the stem and leaves on scraps and cut that out and popped up with Dimensionals.  I colored the hydrangea with Blender Pen for a soft look.

My Supplies List (all supplies and images by Stampin' Up! unless otherwise noted):
Stamp Set(s): Because I Care
Ink: Concord Crush, Peach Parfait
Papers:  Peach Parfait, In-Color Pattern Stack DSP
Accessories: Scalloped Oval punch, Oval punch, Scalloped Trim Edge Border punch, Blender Pen, Stampin' Write markers

Saturday, May 28, 2011

Inlaid Embossing - Faux Fabric PLUS Specials

I have seen this effect done on many blogs previously, so it's difficult to credit who started it.
I had some scraps of Beyond the Garden DSP laying around, so I thought I'd cut them all down to 1" square and adhered them to a piece of Daffodil Delight.  Then I inked up my Square Lattice embossing folder with Soft Suede (I tried Crumb cake, but it was too light) and ran the piece of cardstock through the embossing folder.  This is what you get.  What do you think?  Is this cool or what?  Sort of has a mosaic look, too, doesn't it?

Here's another card using the inked up embossing folder as the background.  Then I used the new Flower Garden embossing folder from the Summer Mini as my main image.  After it's embossed, I just used a sponge inked with Melon Mambo, and swiped it across the whole piece, making sure to ink the raised portions well.
My Supplies List (all supplies and images by Stampin' Up! unless otherwise noted):
Stamp Set(s): Word Play, Because I Care
Ink: Pacific Point, Wild Wasabi, Soft Suede, Melon Mambo
Papers:  Daffodil Delight, Pacific Point, Wild Wasabi, Beyond the Garden DSP
Accessories: Square Lattice embossing folder, Flower Garden embossing folder, Decorative Label punch, Corner Rounder punch, Pacific Point Striped Grosgrain ribbon (retired), Wild Wasabi Striped Grosgrain ribbon (retired), sponge, brayer

Do you like the sentiment I used on the first card?  It's from the stamp set, Word Play.  It's on special this month for 30% OFF!!!  WM $41.95, now $29.37.  CM $28.95, now $20.27.
Here's the other stamp sets that are also on special this month.

Animal Stories: WM $15.95, now $11.17
Grunge Rock: WM $20.95, now $14.67;
CM $15.95, now $11.17
Party Hearty: WM $26.95, now $18.87
Printed Petals: WM $19.95, now $13.97;
CM $14.95, now $10.47
Simple Friendship: WM $25.95, now $18.17
Sweet Shoppe Alphabet Lower:
WM $31.95, now $22.37
CM $23.95, now $16.77
You can purchase these and all other Stampin' Up! products from MY STORE HERE.  Or you can simply contact me and I will take care of your order for you!

Wednesday, May 25, 2011

FTL141

Got another Clean & Simple Stamping sketch!  See this week's challenge sketch:
 And my card:
The beauty of Clean & Simple cards is that they are quick to put together, yet they look great, don't they?    Thank goodness for these awesome sketches, huh?

My Supplies List (all supplies and images by Stampin' Up! unless otherwise noted):
Stamp Set(s): Swirls & Curls Verses
Ink: Poppy Parade
Papers:  Poppy Parade, Daffodil Delight, Sunny Gardens DSP
Accessories: Polka Dot embossing folder, Blossoms Bouquet Triple Layer punch, Bitty Punch Pack, Basic Pearl, Scalloped Trim Border punch, Poppy Parade Stitch-Poly ribbon

Tuesday, May 24, 2011

PPA94: Baby

I really enjoy those awesome Pals Paper Arts designers' cards every week.  I thought I should play with this week's design.  I needed a baby card, and this was a perfect design.
I turned the sketch on its side for my card.  Here's my card.
I hand cut those baby onesies.  Let me just warn you... try not to do this late at night when your eyes are tired.  Or maybe I really do need bifocals as my eye doctor warned me. LOL.  I think this card is self explanatory in what I used.  I just wanted to give a shout out to the awesome Quick Accents pack.  They really do make embellishing a card so quick and easy.

My Supplies List (all supplies and images by Stampin' Up! unless otherwise noted):
Stamp Set(s): A Slice of Life, Occasional Quotes
Ink: Peach Parfait, Old Olive, Daffodil Delight, Brocade Blue (retired)
Papers:  Pear Pizzazz, Brocade Blue (retired), Ice Cream Parlor DSP & Quick Accent Pack
Accessories: Decorative Label punch

Monday, May 23, 2011

Monkey Birthday

Once again, playing with those Monkey Ladies. :)  New challenge over at A La Card Monkey is Birthday + Sketch.  Here it is:
I don't know why, but I was about school girl giddy when I saw this challenge.  I had nothing in my mind except I just loved the sketch for some reason.

Here's what I came up with:
I cut the scalloped rectangles using my electronic cutter.  Everything on this card just make me smile... Sunny Garden DSP, the wide ribbon, button, colors, cake...  This was a fun one to do.  Go ahead, try it, you might like it, too!  And while you're at it, please become a follower at A La Card Monkey.  When they get to 300 followers, look at what a random follower would get:

These Goodies are:
  • Occasional Quotes 12 pc stamp set (current Level 3 hostess set)
  • Thankful Thinking 6 pc stamp set
  • Purely Pomegranate 8-1/2" x 11" card stock
  • Glassine Rectangle Envelopes (20)
  • Variety of Jumbo Grommets
  • Magic Mesh - Natural
Pretty awesome, huh?

My Supplies List (all supplies and images by Stampin' Up! unless otherwise noted):
Stamp Set(s): A Slice of Life, Create a Cupcake (sentiment)
Ink: Poppy Parade
Papers:  Daffodil Delight, Peach Parfait, Sunny Garden DSP
Accessories: Word Window punch, Modern Label punch, Striped Grosgrain ribbon, Brights Button, Cr*cut

Sunday, May 22, 2011

Brayer & Embossing Take 2

Here's another card we made at my last Big Shot Technique class.  'Tis the season... who doesn't need more wedding cards?  I've seen this technique several times on the 'net in the past.  But when I set out to find what I thought I had saved, I couldn't find it.  So I used Mr. Google and found THIS VIDEO very helpful.  I also kind of CASE'd Kim's card from the video.
For this technique, you brayer over the flat side of the embossing folder.  Place your paper on the uninked part.  Carefully close the folder, put it through your Big Shot the usual way.  I found a cheater way of doing this.  As you will see from the video, the brayer doesn't take up very much ink each time, so it takes awhile to ink up the whole embossing folder.  I just took my inkpad, swiped and swirled it around on the embossing folder, then used a brayer to even out the coloring.  MUCH faster this way. :)  Isn't this effect very cool?

Different color combo (River Rock, Old Olive, Rich Razzleberry):
My Supplies List (all supplies and images by Stampin' Up! unless otherwise noted):
Stamp Set(s): Happy Greetings
Ink: Soft Suede, Rich Razzleberry
Papers:  Very Vanilla, Crumb Cake, Soft Suede; River Rock, Old Olive, Rich Razzleberry
Accessories: Finial Press embossing folder, Very Vanilla Satin ribbon, Very Vanilla 3/8" Taffeta Ribbon, Brayer
Related Posts Plugin for WordPress, Blogger...