Showing posts with label Stampin' Up. Show all posts

Friday, August 17, 2012

Fabric Friday - Tohoku Tote

It's finally time for another Fabric Friday!  Ever since I saw the 2011 Convention-exclusive Simply Scored tote, I wanted to make one.  However, my sewing skills wasn't quite up to snuff yet.  Then I saw THIS TUTORIAL on Pinterest, and saved it for that "one day."  Well, that "one day" came and I decided to try it.
I didn't follow the tutorial exactly.  I improvised and tried to make it easier on myself.  Above is the front.  Below is the backside.
Here is the closeup.
The front and back pieces are essentially two separate extra-long fat quarter pieces that come in the package.  So measuring there.  Then for the other pieces, I didn't bother to iron the fabric, I left it folded and just cut along the crease lines.  I'll try to make a pictorial when I make another one.  Anyway, this really wasn't all that hard to make and I am so pleased with the result.

Since Stampin' Up! is having a giant sale on some retired fabric right now for $0.99 a package (3 extra-long fat quarters per package), I'm getting a bunch of fabric and make some totes and bags to sell.  If you're interested, shoot me an email!

******DESIGNER FABRIC CLEARANCE*****

Stampin' Up! has on 4 retired Designer Fabric packs on sale.  They're on sale for only $0.99!!!  For a limited time and only while supplies last, the following discontinued Designer Fabrics from the 2011-2012 Idea Book & Catalog (see p. 196 or here) will be available at the low, low price of just 99 cents on all order types—customer, workshop, and online!
Item
Description
Price
121716
Deck the Halls Designer Fabric
$0.99
121715
Candy Cane Christmas Designer Fabric
$0.99
121817
Springtime Vintage Designer Fabric
$0.99
121818
Sweet Stitches Designer Fabric
$0.99
This is your perfect opportunity to try Stampin’ Up!’s exclusive Designer Fabric for just 99 cents! These cotton fabrics come with 3 Extra-Long Fat Quarters (18" x 27") in each fabric package.  Stock up now for all your fabric needs.  You can use these fabric for all kinds of projects, crafts, sewing, quilting and anything you can think of.  But even if you don't sew at all, you can use fabric on your cards, tear off a strip to wrap presents, make bows, appliques, put through the Big Shot to make die cuts.  There are endless possibilities.  Pick up a few packages now, and I will show you what you can make on my blog. While you're at it, consider adding the Scallop Square Big Shot die (#115950, $21.95) that I use so frequently to cut my fabric with.  Also, you might want to pick up Fabric Adhesive Roll (#122194 $14.95) to adhere fabric to other fabric or clothing.

There is no limit to the quantity of these Designer Fabrics that you can purchase; however, this offer is only good while supplies last.

Contact me TODAY or go to MY WEBSITE to place your order.

Friday, June 15, 2012

Fabric Friday - Rag Bag

Welcome to another Fabric Friday!  I've been wanting to do a rag bag for awhile.  Especially after seeing my friend Anji of Altered Scraps make her rag bags.  Anji and I had inspired each other to sew when I first started using my sewing machine.  It's been fun seeing what projects we come up with.

For this project, I pretty much followed the video instructions from Angie.  Here is the finished bag.
I made side pockets!  For the pocket, I just folded the top scallops down and sewed across.  The inner piece uses the same technique I shared with my last Fabric Friday, where you fold the piece of fabric on the Scallop Square Big Shot die, to create a rectangular piece, rather than square.
 I love this nice touch with the strap and button.
I didn't snip the edges of this bag, because I thought this actually looks kinda nice. :)  As soon as I started using this bag, I got 3 compliments within the first 2 hours.  Makes me very proud.  Go ahead, pick up some fabric and especially the Big Shot Scallop Square die (#115950) from MY STORE, and make this adorable bag!

Friday, June 1, 2012

Fabric Friday - Card Tote

I would like to share a super cute Card Tote today.
I saw this on LeeAnn's blog.  Isn't she so smart?  This is taking my favorite, Scallop Square die, and make the fabric cuts into rectangles!  How brilliant is this???  Just a caution, make sure you note where you wish to fold the fabric or which scallop you are folding on.  And, uh, don't be having instant message chats with people while rolling the Big Shot.  Just sayin'. ;)

The new 2012-2013 Annual Catalog kicks off today!!!!  Do you have your wish list ready?  Would you like to join a share for ribbons, accessories, and/or papers?  If you do, check out my Shares page.  I am now filling 2nd and 3rd rounds of shares.  As soon as the shares are filled, I will invoice you.  Please pay ASAP, so I can place the orders for you!  Any questions, just email me!

I am off to place my order and the 1st round of share orders.  Check back later for projects made with brand new products!

Friday, May 25, 2012

Fabric Friday - Snack Bag

I'm back for another Fabric Friday!  I was just too sick to do any posting last week.  Today's project is a little reusable snack treat bag.  I followed the tutorial from HERE.
I made a couple of different sizes, just for fun.
I also tried our Big Shot Fabric Adhesive Roll to attach fabric to fabric.  This worked like a charm!
Also, I decided to sew a top-stitch line just under the velcro, just because. :)
The small bag on top is from Twitterpated Designer Fabric.  The bottom one is from Summer Smooches Designer Fabric.  The stars are from left over Springtime Vintage Designer Fabric on my table, and were cut using the retiring Stars #2 Big Shot die.

Friday, May 11, 2012

Fabric Friday: Key Chain

We are back for another edition of Fabric Friday!  Today's project is a super simple one.  I followed the directions from THIS BLOG.
Close-up.
This was the second one I made.  I didn't get a chance to photograph the first one, before I shipped it off to a friend.  Anyways, for the first one, I thought I should outsmart the tutorial writer and do something clever on my own accord.  Well, let me tell ya, there's a reason why people write their tutorials.  For this second one, I followed the tutorial, pretty much exactly.  And it is very simple!  Seriously, if you can turn your sewing machine on and sew a straight line, you're in business!

In the spirit of retiring products month, this particular fabric line is the to-be-retired Springtime Vintage Designer Fabric.  You know what's so fabulous about it, other than the prints?  It's deeply discounted at $2.99 per package!  You will get 3 bigger than standard fat-quarter-size fat-quarters.  I stocked up, and you should, too!  Get it while supply lasts at MY STORE.

Click HERE for the Retiring Stamp Sets
Click HERE for the Retiring Accessories
Click HERE for the Retiring Definitely Decorative

Thursday, May 10, 2012

2012 Annual Catalog Sneak Peek!

Did ya miss me?  LOL.  Sorry for a bit of delay and lack of posts this week.  I waited up for the release of the brand new Annual Catalog online just for Demonstrators on Sunday night.  Spent quite a bit of time into the wee hours of morning glancing quickly at the catalog and placing my pre-order.  Then I spent the next couple of days trying to catch up on sleep.  But those darn kids kept me busy!  And now guess what?  My order came yesterday!  I got the new In-Colors... wait till you see them.  Quite yummy!  AND, the stamp pads have been re-configured to use a firm foam pad, rather than a felt pad.  Gosh, these inks stamp sooooo nicely!  When we are able, after June 1st, I will show them to you.  I also got a couple of stamp sets, new framelit, ribbon, and pattern paper.  I didn't order everything that I could on the pre-order, because I'll have plenty of time for the rest of the year to keep adding to my stash, right?  Just want to pace myself.

SOOOOO..... since you were so patient in waiting for my post this week, I will show you what I made with my new goodies!
I hope this card shows up okay on the blog.  I took the picture at night, so the light is not the best.  OK, are you ready?  I mixed the new with some existing stuff and a retiring product.  Can you tell which is which?  I CASE'd this card from the new catalog.  I used a couple of new colors: Midnight Muse,  Primrose Petals, and Summer Starfruit.  The cake stamp set is called Make a Cake.  The sentiment is from a separate set called, Itty Bitty Banners.  I used a new Banner Framelit.  The pattern paper is called, "Patio Party."

Did you figure out what's the retiring product?  It's the Texturz plate on the Baja Breeze pieces.  The original card uses an embossing folder that we can't order yet, so I thought I'd use something that's not going to be available after this month.

My Supplies List (all supplies and images by Stampin' Up! unless otherwise noted):
Stamp Set(s): Make a Cake, Itty Bitty Banners
Ink: Midnight Muse, Primrose Petals, Summer Starfruit
Papers: Midnight Muse, Primrose Petals, Baja Breeze, Patio Party DSP
Accessories: Texturz plate, Pennant punch, Word Window punch, Banners Framelit, Scallop Border punch, Baker's Twine, Bitty Button, Beautiful Wings embosslit

Click HERE for the Retiring Stamp Sets
Click HERE for the Retiring Accessories
Click HERE for the Retiring Definitely Decorative

Friday, May 4, 2012

Fabric Friday - Passport & Travel Documents Holder

Hooray for another Fabric Friday today!  Today's project is a Passport & Travel Documents Holder that I saw on Pinterest.  I kind of followed the tutorial from THIS BLOG.

I used Timeless Portraits Designer Fabric for this project.

Here it is closed.  I just used sew-on velcro.
 Opened up inside.  It has several pockets to stow tickets, passport, itinerary, etc.
In Stampin' news, if you love the sets in the Occasions Mini Catalog, you are in luck! Because of the short time period between the end of the Occasions Mini Catalog and the launch of the 2012-2013 annual catalog, Stampin' Up! has decided to make the carryover stamp sets available early--starting today!
The following stamp sets are available for purchase. We hope you will enjoy this extra little sneak peak to the annual catalog.
 Stamp Set Name
 Item Number
 Wood-Mount
 Clear-Mount
 Baby Prints    
 125470    
 125472
 Love & Laughter
 125475
 125477
 Bordering on Romance
 125480
 125482
 Apothecary Art
 125525
 125527
 Mixed Bunch
 125535
 125537
 Tea Shoppe
 125545
 125547
 Mouthwatering
 125675
 125677
 Loving Thoughts    
 125843
 125845
 Salon de thé
 125934
 125936
 Etiquetas florales
 --
  125941        
 Art floral
 125964
 125966

Click HERE for the Retiring Stamp Sets
Click HERE for the Retiring Accessories
Click HERE for the Retiring Definitely Decorative

Friday, April 27, 2012

Fabric Friday - Small Tote with Button

Yay for another round of Fabric Friday!  Guess what I have for you today?  Can you guess?  Yes, it's another tote!!!  Originally I made this for me.  But it turned out a little smaller than I expected, because I apparently can't do math.  Then as soon as my daughter saw it, she claimed it for herself.  So I guess I made it for her.  LOL.

This is made with the Flirtatious Designer Fabric again.  For the handles, I got lazy and pulled out my Striped Grosgrain ribbon.  I put two together and stitched up the sides.
Oh, and I used the Square Scallop die for Big Shot again.  Seriously, that thing is like a work horse around here.  Totally getting my money's worth.  Although hard to tell, I made a little box corner for the bottom of the tote.  The lines are perfect on this one, which makes me very proud of myself. :)

Here's a close up.  Because I had put batting in between the lining and the outer fabric, it felt a little bulky, especially at the top.  So I thought I would give the buttonhole function on my machine a try.  Holy Batman!  That is one cool function!  Oh, did you also see what I did with the ruffle?  I took two scrap strips of fabric, put them at right angles to each other and sewed at 45-degrees.  This way, the two pieces would be joined to become one long strip.  Perfect for me to do some ruffle/gathering.
I used the Fun Flowers die again for embellishment.  Again, as before, I had lined the fabric with some fusible interfacing to make it just a little stiffer.  The button is Melon Mambo from the Ice Cream Parlor suite, which you can find on the Clearance Rack.
Items from the Clearance Rack can only be ordered online at MY STORE.  Which you're there, check out the other really awesome stuff at a fraction of the original cost.

Thanks for visiting!  Have a wonderful weekend!!!

Friday, April 20, 2012

Fabric Friday - Card Holder & Pin Cushion

This is such a cute little card holder.  It's small and flat that you can easily throw in your purse.  I used the tutorial from HERE.  Of course I had to use our awesome Stampin' Up! fabric.  The top one is Twitterpated.  The bottom one is Deck the Halls.
Here's the inside.
The next little project is a pin cushion.  Have I sung enough praises for our Square Scallop die for cutting fabric?  No?  Oh, okay.  LOL.  I LOVE using this die to cut fabric.  This is just two cut out pieces.  Sew up 3 sides, stuff batting, sew up last side.  Hand sew a button and pull tight in the middle.  It's so cute.  I love it.  It's close to me by the sewing machine when I'm sewing.
I used a different pattern for the other side.
The fabric is from Springtime Vintage.

Friday, April 13, 2012

Fabric Friday - Scissors Cover and Tutorial

This week's Fabric Friday is a project that I put together on a whim, after seeing some pictures in the demo world.  It's a Scissors Cover.  I used Petal Cone die for my cover.
And guess what?  I even wrote up a TUTORIAL for you!  I made this with my sewing machine.  But since it's so small, you can totally handstitch, if you'd like.  I don't like to hand stitch anything whatsoever, that's why I used the machine.  I think if you do one of those "blanket stitch" with a thicker thread, it would look really cool, too.

The fabric is Sweet Stitches Designer Fabric.  The button is Tempting Turquoise Designer Button.

Friday, April 6, 2012

Fabric Friday

Yeah, for another edition of Fabric Friday.  Today's project is.... another tote.  Haha.  I think I'm developing a tote fetish.

This fabric is from the Summer Smooches suite.
I didn't use my Big Shot to cut the squares this time.  I wanted the squares to be a bit bigger.  Oh,  my inspiration bag is from Sandy.  Here's a note, more to myself than anyone else, READ what she said closely.  She used the Big Shot Scallop Square die... I cut my squares bigger.  So my bag dimension is not the same as Sandy's.  Two, after making this bag, I realized the importance of precise cutting and lining up the seams between the squares.  Or maybe if I knew how to sew better, I'm sure there's ways to compensate for my shortcomings.  Oh well, just realize I am a novice sewer and what I make is only to make myself happy. :)

When I saw Sandy's bag, I just LOVE the ruffles on top.  I know ruffles are not easy to do.  But I just had to try it.  I found THIS VIDEO online and thought it seemed easy enough.  I found that on my machine, I had to do 2 stitches in order to draw up the bobbin thread.  You may just have to play with your machine to figure it out.  That was the toughest part of the whole thing.  Then, just make sure you set your machine to the widest and longest zig zag stitch and go slow.  Oh, #3, another note to self, make sure the piece of fabric for gathering is minimum 2" when folded.  Do the gathering stitch about 1/2" in; then sew onto bag about another 1/4" further in.
This bag turned out to be reversible, so I made sure to have a pocket on the inside, too.
The whole figuring out how to pin each layer and where to place each element/layer was a bit confusing.  I think I had to rip out seams at least twice.  Definitely much harder than making cards.  In another Fabric Friday, I will show you another bag with a pictorial of how to put each layer together.

Friday, March 30, 2012

Fabric Friday

Welcome to another edition of Fabric Friday!  I am so in love with sewing.  If only we had machines like we have today when I was in Home Ec, oh so many decades ago, I may not have been so intimidated by it!  I love it even more, though, that we have fabulously coordinated fabric from Stampin' Up!  There's no need to look through tons of fabric at the store trying to figure out if they go together.

Today's project is a super simple one!  If you can sew a straight-ish line, you're in business!  Actually, you could even handstitch this, since it's not a big project.
 I made this for one of my workshop hostesses recently.  I wanted to make her something different than just cards to thank her for hostessing during Sale-a-Bration and introducing me to some new friends.  I got a few packages of Flirtatious Designer Fabric for FREE as my Sale-a-Bration free products, and thought it would be a great time to use it.  I ran the fabric through my Big Shot, using the Scallop Square clearlit die.  Using our Big Shot this way makes it so simple.  There's no measuring with a ruler, definitely no scissors or rotary cutter cutting, and no need to make sure you have perfectly square pieces.  Plus, I am able to run through 8 layers of fabric together at once.

Please let me know if you need further instructions on making this tote.  It really is easy.

  1. You need a total of 10 pieces of scallop sqaures.
  2. I put pieces of batting between the squares and secured by sewing an X across each pair.  You've now created the panels.  You should now have 5 of these.
  3. Then, I sewed up the sides, leaving the last (4th) side open.
  4. Sew the top closed.  I stopped between each side, but you can also just sew straight across all four.  REMEMBER to insert your handle/ribbons on either sides 1 & 3 or sides 2 & 4.  I would pin these in place BEFORE you start to sew up all the tops.
  5. Sew the bottom panel onto all four side panels.
  6. Sew up the last side panel.
  7. Embellish as desired.

I ironed on some fusible interfacing (follow manufacturer's instruction) on some scrap fabric to make it a little stiffer.  Then I ran the fabric through my new Fun Flowers die (wait till I show you some cards I made with it!).  I put small pieces of batting between each flower layer to make it a little more dimensional.  Lastly, I used my Crop-a-Dile to punch a small hole in the middle for the brad prongs to go through.  The brad is the Printed In-Color Designer Brads.  I hand sewed the flower onto the tote.

What do you think?  It's a cute little thing, huh?  You can definitely carry some inkpads, dimensionals, Tombow in it.  Or you can just fill it with treats like I did. :)  Hope you enjoyed this little cutie.  Please let me know what you think!

Friday, March 23, 2012

Fabric Friday - Tote

Today's Fabric Friday project is a tote that I saw online.  I was a bit confused (quite a bit, actually) as to how to face the fabric once they get together.  Anyways, I guess sometimes things are easier when you just do it!  And this is how it turned out.
This is the Sweet Stitches fabric.  You know what else is really cool using Stampin' Up!'s fabric?  There's coordinating buttons!  I decided to pretty up the handle by first stitching through the center to make it a bit gathered.  Then I sewed on the coordinating buttons in: Tempting Turquoise, Daffodil Delight and Riding Hood Red.
This is a perfect size tote to carry my card samples to workshops.  Now I've gotta go make more cards to fill it up!

Friday, March 16, 2012

Fabric Friday - French Memo Board

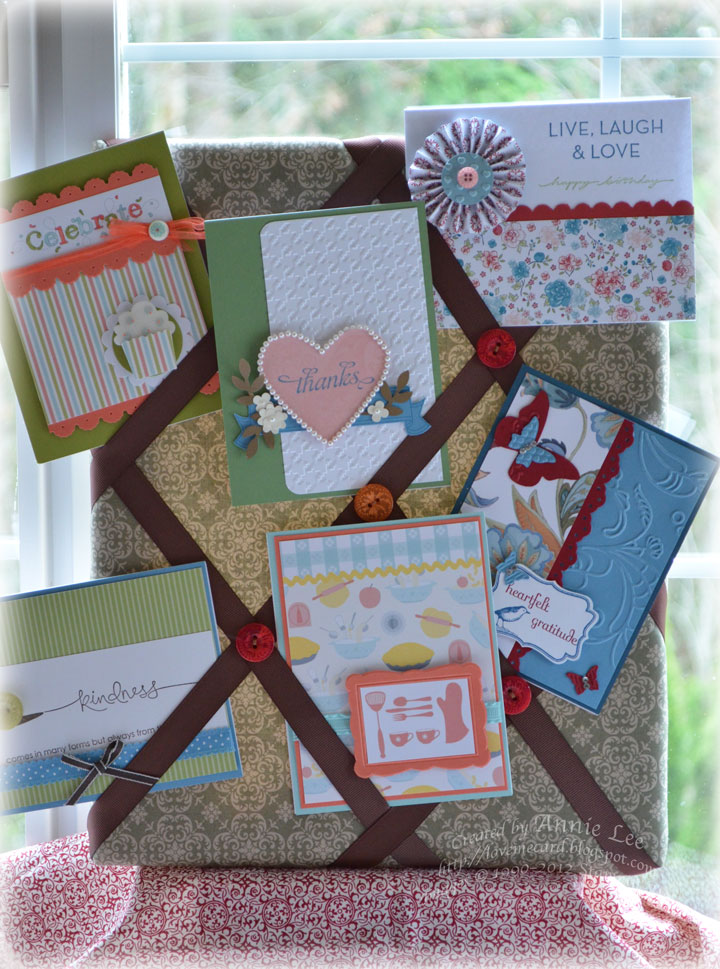
Today's Fabric Friday project is a French Memo Board.  I had seen these long ago on HGTV, 'cause I was into home improvement at that time.  But of course, I just put it in the back of my mind as one of those things that ONE DAY I MIGHT do.  Fast forward many years to now.  I asked on Splitcoaststampers.com forum about displaying our cards.  Someone mentioned the French Memo Board again.  So I went on a hunt.  I found THIS TUTORIAL.  And this is what I made with Deck the Halls fabric.  You know what's even better with this project?  This is a NO SEW project!  Just arm yourself with a staple gun and batting and you're good to go!
This seriously took almost no time at all.  Each board probably took me 30-45min, depending on whether I was sewing the buttons or not.  The biggest tip I can give you is to buy ARTIST CANVAS.  It makes sewing buttons or pushing brads through very simple.  And they're cheap!

This is the board with my cards on it.
Here's another board I made.
I actually made 3.  But gremlins ate my pictures from my hard drive, so I no longer have the 3 boards together to show you.
ETA: I was browsing at J0ann's this morning and saw similar size ready-made French Memo Boards for... get this... $24.99!!!  Wowzers!  Does that make you want to make your own or what?!

Friday, March 9, 2012

Fabric Friday

I am not going to promise anything... but I hope I will be able to make enough things to share with you using our Designer Fabric for awhile.
I saw this tote on Craft Project Central.  As you know, I'm a brand new, beginner sewer.  When I saw this Rag Quilt Stamper's Tote, I thought I'd challenge myself and see if I can figure out how to make it.  Well, it only took me a few days thinking about logistics, which pieces need to go where and in what order; and ripping out some seams in the process to make it all work out.  I am so pleased with the outcome.  Now, I'm glad you can't actually hold this in your hands to inspect it, haha.  Because a lot of my stitches are not exactly straight.  For the handle, I went the easy route and attached the now retired Rose Red ribbon.

Here's a look at the inside.  I even made dividers!
Out of respect to Carrie, the tutorial creator, I will not give any hints on how I put this together on the blog.  If I'm able to figure it out, though, I'm sure you can, too!  Go ahead, get a few packages of our awesome fabric and try it out for yourself!  You can get a package of the Flirtatious fabric for FREE when you place a $50 order by end of March.  Seriously, try it.  It's fun, I guarantee it!

Friday, March 2, 2012

Springtime Dress

I had so much fun making projects for the blog hop yesterday.  I just can't get enough of our fabric lately!  After a trip to a local fabric store and checking out their remnants table, I realized the price of our fabric is actually not bad at all.  In addition, the patterns are well coordinated; whereas in the store, I was completely overwhelmed.  I came home with non-coordinating fabrics that I'm not sure I know how to use. :(

Anyways, she doesn't know this, but after reading and looking at Lyssa's fabric dress tutorial last August, I was totally inspired to learn how to sew.  Naturally, once I got my very own sewing machine, that dress was one of the first projects I did.  I used Springtime Vintage Designer Fabric.
Isn't this dress darling???  And the biggest compliment is that my daughter kept asking to wear it!

Here is a closeup of the flower.
I was very proud of myself when this dress came together.  Although later on, I figured out that I had skipped several key seamstress musts.  Oh well.  The dress still held up through the washing machine, so it's not bad, right?

Thursday, March 1, 2012

Stylin' Stampin' Squad Blog Hop: Mar 2012

It's time for our monthly Blog Hop!  I'm very excited to share my projects with you today.  If you just came from Shellie's Blog, welcome!  This month's theme is Easter/Spring/Baby/St. Patrick's Day.  Wow, that was a mouthful.  I'm so ready for arrival of Spring, that I decided to make my card a Spring card.
I know you're scratching your head thinking, didn't this stamp set retire with the last Occasions Mini?  Well, the physical stamp set did, yes.  But what I'm using is the Digital Stamp Brush Set, which NEVER RETIRES!!!  How stinkin' awesome is that?!  Last year I did a whole series of Digital Easter Blossoms, because I just love it so much.  I'm so happy to be able to bring her out again this year.  BTW, you, too, can have this stamp brush set (#124436), for only $3.95!  You can order it online via MY STORE.  And if you haven't tried My Digital Studio software yet, Stampin' Up! is now offering a free 30-day trial for it!  You can read all about it HERE.  Although the trial does not come with much in the way of content, digital downloads are so inexpensive, you can purchase and download a couple to play with.  Plus, you can download it right away after you place your order.  Talk about instant gratification!
My Supplies List (all supplies and images by Stampin' Up! unless otherwise noted):
Stamp Set(s): Easter Blossoms (Digital)
Ink: Crumb Cake, Soft Suede
Papers: Bashful Blue, Blushing Bride, Beau Chateau DSP
Accessories: Labels Framelits, Blushing Bride Ruffled Satin ribbon, Oval punch, Scallop Oval punch

Now, with arrival of Spring comes the arrival of Allergy Season.  Can't leave home without your Kleenex!
Now you can tote your tissues in this fabulously cute Tissue Holder.  You can find the tutorial HERE.  I don't know why I didn't do this as my very first sewing project ever.  It's so easy, you can easily make several at once.  The fabric is from the Twitterpated suite.

You know what else arrives with Spring?  Baby animals!
What do you think of this special SU fabric-outfitted baby owl?  Pretty cute, huh?  You know where I got the pattern???  Our MDS program!  Did you know that there is a punch download available for our Two-Step Owl (#122153)?  I called it up in MDS, enlarged it as big as I wanted.  I gave it a mat, so I can see the outline.  Printed it out and that became my pattern!  It's only $0.95 for the digital download.  It's got to be the cheapest pattern out there for the cutest owl out there!  For the eyes, I used Circles #2 die for the Big Shot.  For its beak, I just cut a piece of felt and put it behind the eyes and shirt.  I didn't bother with its feet, because it was too hard to cut out.

Well, that's the end of this stop.  If you like what I've made here, please feel free to look around my blog.  And if you like me enough, please follow me, subscribe to my blog or Pin me!   Next up is Creative Pam.  Go on over and see what she's got in store for you!
        

Blog Hop Participants:
  1. Shellie G. of Creative Electica
  2. Annie L. of Love Me Cards  <--- You are here!
  3. Pam S. of Stampin' in the Sun!
  4. Nancy B. of Lady Stamps a Lot
  5. Anji C. of Altered Scraps Blog
  6. Rose C. of Stamp with Rose
  7. Tonya B. of Stampin' with Tonya
  8. Amanda H. of Live Laugh Craft
  9. Dawn S. of Dawn's Creative Chalet
  10. Patricia T. of Sunnyone Stampin'
  11. Heather W. of Heather's Stampin' Blog
  12. Pamela W. of Stinky Tofu
  13. Linda O. of Stamp at Linda's
  14. Marla R. of Marla's Stampin' Spot
  15. Michele M. of Michele's Stampin' Blog
  16. Darcy J. of DJ's Stampin' Place
  17. Nicole B. of Creations by Mommy
  18. Pam S. of Sunny Girl Scraps
  19. Kim R. of Stamping with Kim
Related Posts Plugin for WordPress, Blogger...